
Every autumn, when the leaves start to turn and there’s a crispness in the air, my heart always goes back to those iconic Pillsbury sugar cookies. You know the ones! But for my vegan friends and family, those were always off-limits. That’s why I poured my heart into creating these Easy Copycat Vegan Pillsbury Pumpkin Sugar Cookies. They bring all that nostalgic, comforting fall feeling right into your kitchen, and trust me, they taste just like you remember, only better because they’re made with love and plants!

Why You’ll Love This Easy Copycat Vegan Pillsbury Pumpkin Sugar Cookies
- They’re super festive: These cookies scream autumn with their adorable pumpkin shapes and vibrant colors.
- Surprisingly easy to make: Don’t let the layers intimidate you; the process is fun and totally doable for any baker.
- Perfectly soft and chewy: They have that classic sugar cookie texture that just melts in your mouth.
- Crowd-pleasing for everyone: Whether you’re vegan or not, these cookies are a guaranteed hit at any fall gathering!
Ingredients You’ll Need
- Vegan butter: Make sure it’s at room temperature for easy creaming. This is crucial for that fluffy texture!
- Organic powdered sugar: This gives the cookies their sweetness and helps create that smooth, tender crumb.
- Vanilla extract: A good quality vanilla makes all the difference in sugar cookies. Don’t skimp!
- Baking powder: This is our leavening agent, giving the cookies a slight lift and softness.
- All-purpose flour: The backbone of our cookie dough. Make sure to measure it correctly!
- Dairy-free milk: Just a touch helps bring the dough together. Use any unsweetened plant milk you prefer.
- Vegan food coloring: Essential for those vibrant pumpkin colors! Look for natural, plant-based options.
How to Make Easy Copycat Vegan Pillsbury Pumpkin Sugar Cookies Step by Step
First things first, get your vegan butter nice and soft at room temperature – this is key for a smooth dough. In a big bowl, you’ll cream that butter until it’s light and fluffy, about 1-2 minutes. Then, you’ll add in your powdered sugar, vanilla, baking powder, and sea salt. Mix it until it looks like a beautiful buttercream frosting. Now for the flour! Add it in, along with just one tablespoon of dairy-free milk. Use a silicone spatula to gently fold it all together. It might seem a little stiff at first, but keep folding; it will come together into a lovely, cohesive dough. If it’s really dry, add that second tablespoon of milk, but usually, one is enough!
Next comes the fun part: coloring your dough! You’ll divide your dough strategically to get your vanilla, orange, and green portions. For the orange, you’ll add a drop of red and 3-4 drops of yellow food coloring to a quarter of your dough. This is where food-safe gloves come in handy – it’s like playing with play-dough! For the green, you’ll take an eighth of the dough and mix in a drop of blue and 3-4 drops of yellow. Once all your dough is beautifully colored, wrap each portion in plastic wrap and pop them into the fridge. They need a good 2 hours to chill and firm up – this makes them much easier to work with.
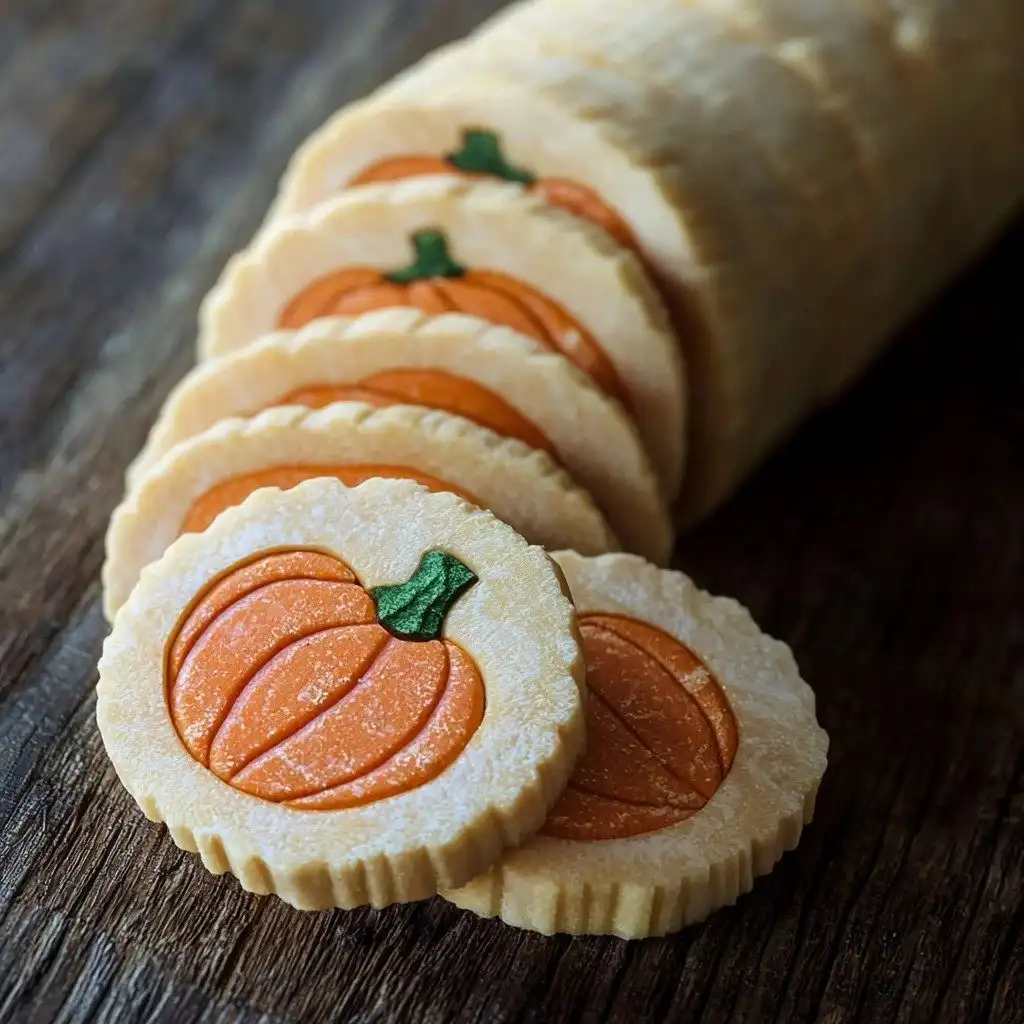
After chilling, it’s time to assemble our pumpkin log! Take your orange dough and shape it into a long, semi-flat log, about 1/2-inch wide and 1 1/4 inches tall. Do the same with the green dough, but make it about 1/4-1/2 inch tall. Line up the green log right next to the orange one. Now, grab your pumpkin cookie cutter and start cutting out those cute pumpkin shapes along the log, making sure the stem lines up with the green. Stack these cutouts on top of each other, then wrap the whole log in plastic wrap and freeze it for 20 minutes. While that’s chilling, roll out your vanilla dough into a rectangle. When the pumpkin log is firm, you’ll place it in the middle of your vanilla dough, wrap the vanilla around it, and gently roll to form one large, beautiful log. Chill this final log for another 30 minutes to an hour. While it’s chilling, preheat your oven to 375°F and line some baking sheets with parchment paper. Slice your chilled log into 1/4-1/3 inch thick cookies, place them on the sheets, and bake for 12-14 minutes until the edges are just golden. Let them cool a bit, then enjoy your adorable, delicious cookies!
My Top Tips for Success
- Don’t skip the chilling: I always make sure to chill the dough for the full recommended time. It makes the dough much easier to handle and prevents the cookies from spreading too much.
- Measure flour accurately: Trust me on this one, too much flour can make your cookies dry, and too little can make them spread. Use a kitchen scale if you have one!
- Use food-safe gloves for coloring: This saves your hands from becoming rainbow-colored and makes mixing the dough much easier.
- Be patient when forming the log: Take your time aligning the orange and green dough and cutting the pumpkins. It’s worth it for those perfect shapes!
- Don’t overbake: Keep an eye on them! You want slightly golden edges, but the centers should still be soft.
Common Mistakes to Avoid
- Overworking the dough: This can lead to tough cookies. Mix until just combined, especially after adding the flour.
- Not chilling the dough enough: Your cookies will spread and lose their shape if the dough isn’t firm. Make sure to follow the chilling times.
- Using too much dairy-free milk: Only add the second tablespoon if the dough is truly dry and crumbly. A slightly stiffer dough is better for cutting shapes.
- Baking on hot sheets: Always use cool baking sheets. If you’re baking multiple batches, let your sheets cool completely between uses, or use multiple sets.
How to Store Easy Copycat Vegan Pillsbury Pumpkin Sugar Cookies
- Countertop: Store in an airtight container at room temperature for up to 3-4 days.
- Fridge: Store baked cookies in an airtight container for up to a week.
- Freezer (baked): Place cooled cookies in a single layer on a baking sheet to freeze solid, then transfer to a freezer-safe bag or container for up to 2-3 months. Thaw at room temperature.
- Freezer (unbaked dough): The unbaked log can be wrapped well and frozen for up to 3 months. Slice and bake from frozen, adding a minute or two to the bake time.
Frequently Asked Questions
Can I make these cookies gluten-free?
I haven’t tested this recipe with gluten-free flour myself, but a 1:1 gluten-free all-purpose flour blend might work. Be sure it contains xanthan gum.
What if I don’t have a pumpkin cookie cutter?
You can still make these! Instead of cutting out shapes, you’d create a similar orange and green log, but then you could just slice it into round cookies. They’d still be delicious and festive with the colors!
Can I use regular butter and milk?
Yes, if you’re not vegan, you can absolutely use regular unsalted butter and dairy milk in the same quantities. The method will remain the same.
Why did my cookies spread too much?
This usually happens if the dough wasn’t chilled enough, the butter was too warm, or perhaps too much flour was added. Make sure to follow the chilling times closely!
How can I make the colors more vibrant?
You can add an extra drop or two of food coloring to the dough. Keep in mind that natural vegan food colorings can sometimes be less intense than artificial ones.
I hope these Easy Copycat Vegan Pillsbury Pumpkin Sugar Cookies bring a huge smile to your face and fill your home with the most wonderful fall aromas. They’re truly a labor of love, and I can’t wait for you to try them. If you whip up a batch, please let me know how they turn out – I love hearing from you!
PrintEasy Copycat Vegan Pillsbury Pumpkin Sugar Cookies

Capture the nostalgia of autumn with these delightful, soft, and chewy vegan pumpkin-shaped sugar cookies, perfect for any fall celebration.
- Prep Time: 45
- Cook Time: 14
- Total Time: 199
- Yield: 24 cookies
- Category: Dessert
- Method: Baking
- Cuisine: American
- Diet: Vegan
Ingredients
- 1 cup (226 g) vegan butter, room temperature
- 2 cups (240 g) organic powdered sugar
- 2 tsp vanilla extract
- 1 tsp baking powder
- 1/4 tsp sea salt
- 2 1/2 cups (313 g) all purpose flour
- 1–2 tbsp dairy free milk
- 1 pea-sized drop vegan red food coloring
- 4-7 drops vegan yellow food coloring, divided
- 1-2 drops vegan blue food coloring
Instructions
- Measure out all ingredients, except for the food coloring.
- Read through all instructions before beginning.
- Add the powdered sugar, vanilla extract, baking powder, and sea salt to the bowl.
- Mix again until well combined.
- Add the flour to the mixture.
- Add 1 tablespoon dairy free milk to the mixture.
- Use a silicone spatula to fold the flour into the wet ingredients.
- Add another tablespoon of dairy free milk only if the dough is still very dry and crumbly.
- Divide the dough in half.
- Divide one half of the dough in half again.
- Remove one quarter of the dough and place it into a small bowl (for orange coloring).
- Divide the remaining quarter of dough in half.
- Take the now eighth of dough and place it into another small bowl (for green coloring).
- Add 1 drop of vegan red food coloring and 3-4 drops of vegan yellow food coloring to the bowl with the quarter dough.
- Use food-safe gloves to mix the coloring into the dough until evenly distributed.
- Adjust the orange color as desired.
- Add 1 drop vegan blue food coloring and 3-4 drops vegan yellow food coloring to the bowl with the eighth dough.
- Use food-safe gloves to mix the coloring into the dough until evenly distributed.
- Adjust the green color as desired.
- Wrap each cookie dough (vanilla, orange, and green) in separate plastic wrapped discs.
- Place the cookie dough into the fridge to chill for 2 hours.
- Remove all cookie dough from the fridge.
- Set aside the vanilla cookie dough to rest at room temperature.
- Shape the orange cookie dough into a long log, about 1/2 inch wide and 1 1/4 inches in height (about 10-12 inches in length).
- Use a rolling pin to roll the top of the orange log smooth.
- Shape the green cookie dough into a long log, about 1/2 inch thick and 1/4-1/2 inch in height (about 10-12 inches in length).
- Line up the green cookie dough along the orange cookie dough to form one large log.
- Take your 1.5 inch pumpkin cookie cutter.
- Cut pumpkin cookie shapes along the log, lining the stem with the green and the pumpkin body with the orange.
- Place each pumpkin cookie cutout stacked on top of each other.
- Reform any scraps into a smaller orange and green log and continue cutting.
- Carefully wrap the log of pumpkin cookie cutouts in plastic wrap.
- Place into the freezer to chill for 20 minutes.
- Lay the plastic wrap from the vanilla cookie dough flat.
- Place an extra plastic wrap piece on top of the vanilla dough.
- Roll the vanilla dough to be about 12 inches by 4-5 inches long.
- Remove and discard the top plastic wrap piece.
- Remove the pumpkin sugar cookies from the freezer.
- Place the pumpkin log onto the vanilla cookie dough right in the middle, aligning the lengths.
- Pick up each side of the vanilla cookie dough.
- Practice wrapping the pumpkin cookies to see where the dough will overlap.
- Use a sharp knife to slice off the overlapping pieces of vanilla dough.
- Roll those sliced pieces into two long 12 inch logs.
- Place those vanilla logs on either side of the pumpkin stems.
- Press them into the pumpkins to shape the pumpkins into one large cylinder.
- Wrap the vanilla cookie dough over the pumpkin sugar cookies.
- Gently roll the log so that the vanilla cookie dough presses into the pumpkin cookies and forms one large log.
- Wrap the log again in plastic wrap.
- Chill the log for 30 minutes to 1 hour in the fridge.
- Preheat the oven to 375°F while the dough is chilling.
- Line 2 large baking sheets with parchment paper.
- Remove the cookie dough from the fridge.
- Slice the cookie log into 1/4 inch to 1/3 inch thick cookie slices.
- Place the cookies onto the baking sheets, spacing them about 2 inches apart.
- Place the cookie sheets into the oven.
- Bake for 12-14 minutes, or until the edges are slightly golden.
- Remove the cookies from the oven.
- Allow them to cool for 5-10 minutes before enjoying.
Notes
Ensure vegan butter is at room temperature for best creaming results.
Use food-safe gloves when mixing in food coloring to prevent stained hands.
Don’t overbake; remove cookies when edges are just golden for a soft texture.
Chill the dough for the full recommended time for easier handling and to prevent spreading.


