
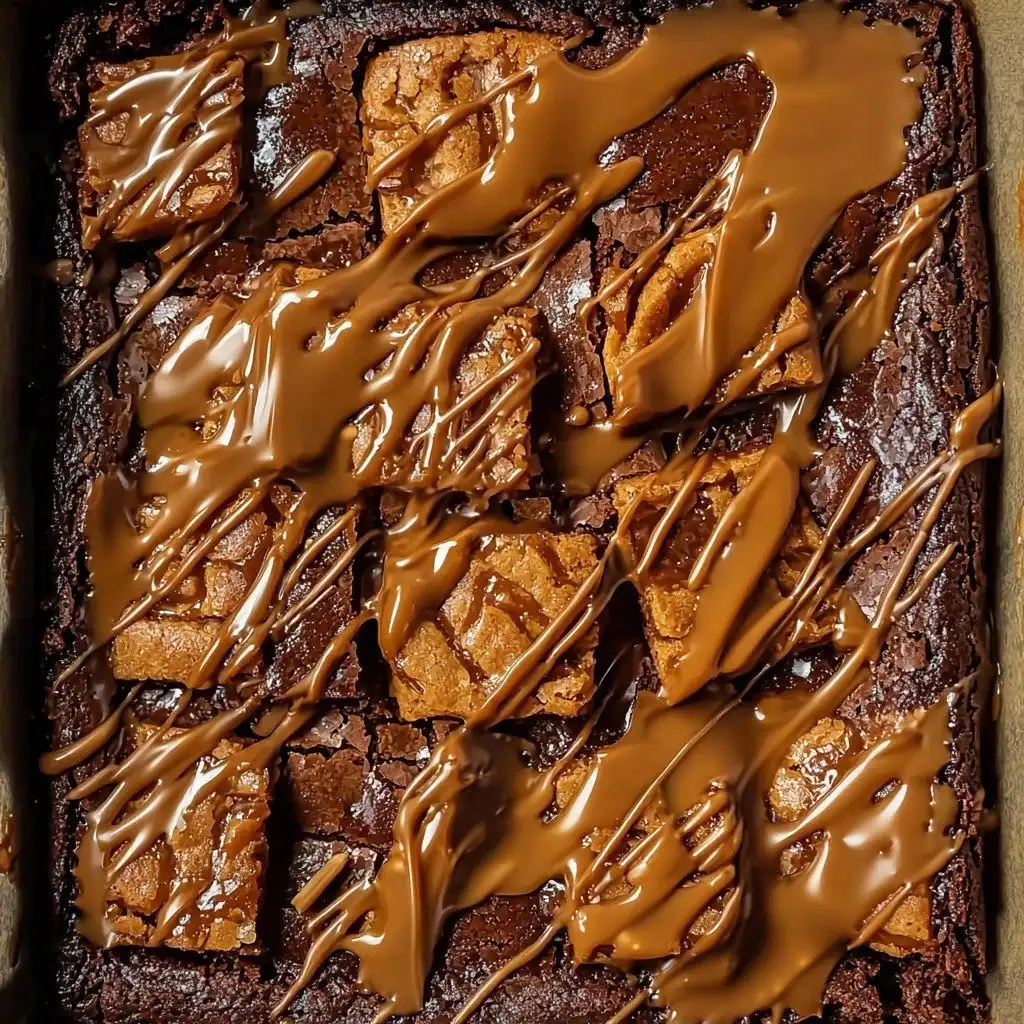
There’s just something about a good brownie, isn’t there? For me, these Biscoff Brownies take me right back to cozy afternoons in my kitchen, a warm scent filling the air. I first made them for a potluck, and they disappeared in minutes! Ever since, they’ve been a go-to when I want to bake something truly special and comforting. The unique flavor of Biscoff just makes them sing!
Why You’ll Love These Biscoff Brownies
- They’re incredibly fudgy and rich, with that perfect brownie texture.
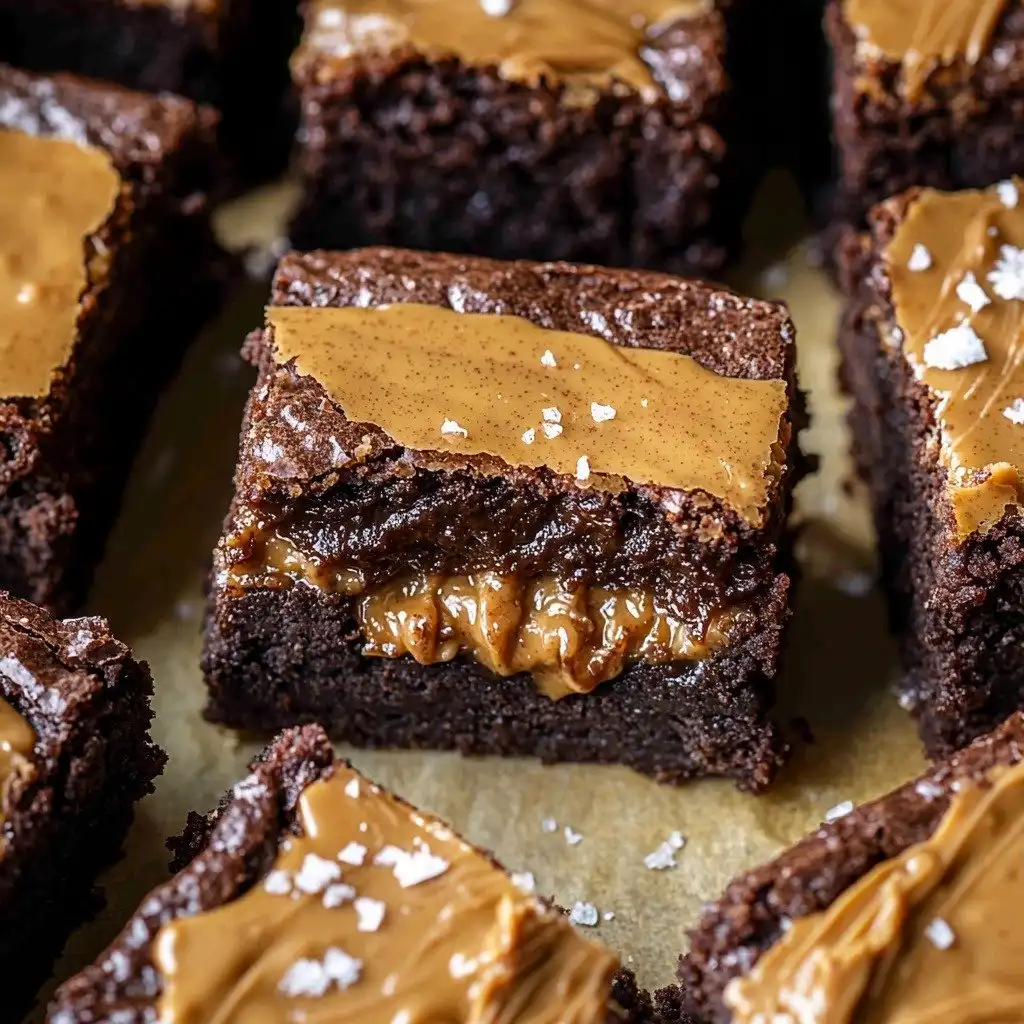
- The Biscoff swirled throughout adds a delicious, spiced caramel note.
- Surprisingly easy to make, even for beginner bakers.
- Perfect for sharing, but you might want to keep them all to yourself!
Ingredients You’ll Need
- Biscoff cookie butter: This is the star of the show! Make sure it’s the creamy kind, not crunchy, for that smooth layer.
- Brown sugar (light or dark) and granulated sugar: The combination gives these brownies a wonderful depth of flavor and chewiness.
- Eggs (large) and egg yolk: Using an extra egg yolk helps create that super fudgy texture we all love in a brownie.
- Unsalted butter: Always use unsalted so you can control the amount of salt in your recipe.
- Semi-sweet chocolate chips: These melt beautifully and give us that classic chocolatey goodness.
- Unsweetened Dutch cocoa powder: For an intense chocolate flavor and a gorgeous dark color.
- All-purpose flour: Make sure to measure it correctly! Spoon and level for best results.
- Espresso powder: Don’t skip this! It doesn’t make your brownies taste like coffee, but it really enhances the chocolate flavor.
- Fine sea salt: A little salt balances the sweetness and brings out all the flavors.
- Biscoff cookies: For that extra crunch and flavor on top!
How to Make Biscoff Brownies Step by Step
First things first, let’s get that Biscoff layer ready. Grab a large piece of parchment paper and press it into your 8×8 metal baking pan. Really crease those bottom edges well – this helps create a guide for your cookie butter. Spread your Biscoff cookie butter evenly within those creased lines, then pop it into the freezer to get nice and firm. This is a little trick that makes a big difference, so make sure it’s completely firm before you move on!
While your Biscoff chills, line your baking pan with a fresh piece of parchment paper, making sure it hangs over all four sides. This makes lifting your cooled brownies out super easy later. Now, preheat your oven to 350°F (180°C). In a separate bowl, whisk together your sugars, eggs, and vanilla extract until they’re nicely combined. Don’t worry about overmixing here, just get it all incorporated.
Next, melt your butter and chocolate chips together until they’re smooth and glossy. You can do this gently over a double boiler or carefully in the microwave. Once melted, whisk in your cocoa powder until smooth. Now, pour that lovely chocolate mixture into your egg mixture and whisk until just combined. This is where the magic starts to happen! Finally, gently fold in your flour, espresso powder, and salt until you no longer see any dry streaks. Be careful not to overmix here – just enough until everything comes together.
Pour about half of your brownie batter into the prepared pan, spreading it evenly to the edges. Now, carefully place your frozen Biscoff cookie butter square right on top of the batter, peeling off the parchment paper. Pour the remaining brownie batter over the Biscoff layer and spread it out evenly. Break up some Biscoff cookies and press them onto the top. Microwave a couple of tablespoons of cookie butter for about 15-20 seconds until it’s runny, then drizzle it over the top of the brownies. Pop them into your preheated oven to bake for 30-40 minutes. You’re looking for a toothpick inserted into the center to come out with a few moist crumbs, not wet batter. Let them cool completely on a wire rack – I know it’s hard to wait, but it’s worth it for fudgy brownies!
My Top Tips for Success
- I always make sure my Biscoff cookie butter layer is *really* firm from the freezer. It helps keep that distinct layer.
- In my experience, using good quality chocolate chips makes a noticeable difference in the final flavor.
- Trust me on this one: don’t overbake! A few moist crumbs on the toothpick means perfect fudgy brownies.
- Cooling completely is non-negotiable for clean cuts and the best texture. Patience is a virtue here!
- I like to gently press the Biscoff cookie pieces onto the batter so they don’t sink too much.
Common Mistakes to Avoid
- Overmixing the batter: This can lead to tough, cakey brownies instead of fudgy ones. Mix only until ingredients are just combined.
- Overbaking: If you bake them too long, they’ll be dry. Always err on the side of slightly underbaked for fudgy results.
- Not chilling the Biscoff layer enough: If it’s not firm, it will melt into the batter too much, and you won’t get that distinct layer.
- Cutting warm brownies: This will result in messy, crumbly brownies. Let them cool completely for clean slices.
How to Store Biscoff Brownies
- Room Temperature: Store leftovers in an airtight container at room temperature for 2-3 days.
- Freezer: After baking, you can freeze them in an airtight container or freezer bag for up to 1 month.
Frequently Asked Questions
Can I use crunchy Biscoff spread?
I recommend using creamy Biscoff cookie butter for the swirled layer. The crunchy kind might make the layer a bit uneven when frozen.
What if I don’t have espresso powder?
Espresso powder really enhances the chocolate flavor without adding a coffee taste. If you don’t have it, you can omit it, but the chocolate flavor won’t be quite as deep.
How do I know when the brownies are done?
A toothpick inserted into the center should come out with a few moist crumbs attached. If it comes out clean, they’re likely overbaked.
Can I double this recipe?
Yes, you can double the recipe and bake it in a 9×13 inch pan. You may need to adjust the baking time slightly, so keep an eye on them!
Why are my brownies cakey instead of fudgy?
This usually happens from overmixing the batter or overbaking. Mix just until combined and watch the baking time carefully.
I hope these Biscoff Brownies bring so much joy to your kitchen and your taste buds. They truly are a special treat! If you give them a try, I’d absolutely love to hear how they turned out for you. Happy baking!
PrintBiscoff Brownies
Rich, fudgy brownies swirled with a creamy Biscoff cookie butter layer and topped with crunchy Biscoff cookies.
- Prep Time: 20
- Cook Time: 40
- Total Time: 60
- Yield: 9-12 servings
- Category: Dessert
- Method: Baking
- Cuisine: American
- Diet: Vegetarian
Ingredients
- 3/4 cup Biscoff cookie butter
- 1/2 cup light or dark brown sugar packed
- 1/2 cup granulated sugar
- 2 large eggs
- 1 large egg yolk
- 1 tablespoon vanilla extract
- 10 tablespoons unsalted butter
- 2/3 cup + 1/4 cup semi-sweet chocolate chips
- 1/4 cup unsweetened Dutch cocoa powder
- 2/3 cup + 1 tablespoon all-purpose flour
- 1 teaspoon espresso powder
- 1/2 teaspoon fine sea salt
- 4-5 Biscoff cookies for the top
- Extra cookie butter for the top
Instructions
- Place a large piece of parchment paper into an 8×8 inch square metal baking pan.
- Crease the bottom edges of the parchment paper to outline the pan size.
- Evenly spread 3/4 cup of Biscoff cookie butter inside the creased edges.
- Chill the cookie butter layer in the freezer until it is firm.
- Line the baking pan with a new piece of parchment paper, allowing it to hang off all four sides for easy removal.
- In a medium bowl, whisk together the brown sugar, granulated sugar, 2 large eggs, 1 large egg yolk, and vanilla extract until well combined.
- In a separate microwave-safe bowl or saucepan, melt the 10 tablespoons of unsalted butter and 2/3 cup of semi-sweet chocolate chips together until smooth.
- Whisk the 1/4 cup of unsweetened Dutch cocoa powder into the melted butter and chocolate mixture until smooth.
- Pour the melted chocolate mixture into the egg mixture.
- Whisk until just combined.
- In a separate small bowl, combine the 2/3 cup + 1 tablespoon all-purpose flour, 1 teaspoon espresso powder, and 1/2 teaspoon fine sea salt.
- Fold the dry ingredients into the wet batter until just combined, being careful not to overmix.
- Pour half of the brownie batter (about 340 grams) into the prepared pan.
- Spread the batter to the edges of the pan.
- Remove the frozen cookie butter square from the freezer and peel the parchment paper off the top.
- Carefully place the frozen cookie butter square on top of the batter.
- Pour the remaining brownie batter on top of the cookie butter layer.
- Spread the batter evenly to the edges of the pan.
- Break up the 4-5 Biscoff cookies into pieces.
- Press the Biscoff cookie pieces onto the top of the batter.
- Warm 2 tablespoons of extra cookie butter in the microwave for 15-20 seconds until runny.
- Drizzle the warm cookie butter over the top of the brownies.
- Bake the brownies in the preheated oven for 30-40 minutes.
- Check for doneness: a toothpick inserted into the center should come out covered in a few moist crumbs.
- Let the pan cool completely on a wire rack before removing the brownies.
- Drizzle more cookie butter on top before cutting, if desired.
- Cut into squares and enjoy!
Notes
Ensure the Biscoff layer is completely firm before adding batter for distinct layers.
Do not overmix the brownie batter; mix until just combined for a fudgy texture.
Avoid overbaking the brownies; a toothpick with moist crumbs is perfect.
Allow brownies to cool completely before cutting for clean slices.


