Easy Gluten Free Sandwich Bread
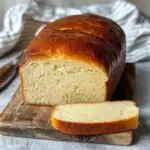
A soft, fluffy, and perfectly structured gluten-free sandwich bread that’s simple to make and tastes just like traditional bread.
- Prep Time: 25
- Cook Time: 70
- Total Time: 205
- Yield: 1 loaf (approx. 960-970g)
- Category: Baking
- Method: Baking
- Cuisine: American
- Diet: Gluten-Free
Ingredients
Scale
- 20 g (4 tbsp) whole psyllium husk
- 280 g (1 cup + 2½ tbsp) lukewarm water
- 230 g (2 cups) tapioca starch
- 135 g (1 cup) millet flour
- 60 g (⅓ cup + 2 tbsp) sorghum flour
- 50 g (¼ cup) caster/superfine or granulated sugar
- 8 g (2½ tsp) instant yeast
- 8 g (2 tsp) baking powder
- 7 g (2¾ tsp) xanthan gum
- 12 g (2 tsp) salt
- 120 g (½ cup) whole milk, lukewarm
- 2 US large/UK medium eggs, room temperature
- 25 g (2 tbsp) sunflower oil
- 1 US large/UK medium egg white, whisked
Instructions
- In a bowl, mix together the psyllium husk and lukewarm water.
- Allow the mixture to sit for 30-45 seconds until a gel forms.
- In a large bowl or the bowl of a stand mixer, whisk together the tapioca starch, millet flour, sorghum flour, sugar, instant yeast, baking powder, xanthan gum and salt.
- Add the lukewarm milk, room temperature eggs, and sunflower oil to the psyllium gel.
- Mix the wet ingredients well to combine.
- Make a well in the middle of the dry ingredients.
- Pour the psyllium gel-egg mixture into the well of the dry ingredients.
- Knead the dough until smooth and all ingredients are evenly incorporated.
- Continue kneading for an additional 4-5 minutes (stand mixer) or 6-8 minutes (by hand).
- Use a rubber spatula to occasionally scrape along the sides and bottom of the bowl to prevent dry patches.
- Turn out the dough onto a generously floured surface.
- Dust the top of the dough with flour.
- Give the dough a gentle knead with floured hands.
- Shape the dough into a smooth ball.
- Use the palms of your hands to gently press the dough into a log shape that fits snugly into a 9×5-inch (23x13cm) loaf pan.
- Carefully transfer the shaped dough into the loaf pan (do not grease).
- Use a bread lame or sharp knife to score the top of the bread with 3 diagonal slashes.
- Lightly cover the loaf pan with plastic wrap/cling film to prevent drying.
- Proof the bread in a warm spot until doubled in size, about 1 hour 15 minutes to 1 hour 30 minutes.
- After 45 minutes of proofing, preheat your oven to 400ºF (200ºC).
- Place a baking steel, baking stone, or heavy-duty baking sheet on the bottom oven rack.
- Once the sandwich bread has doubled in size, gently brush the top with the whisked egg white.
- Place the loaf pan directly onto the preheated baking steel (or stone/sheet).
- Bake at 400ºF (200ºC) for 1 hour to 1 hour 10 minutes.
- Bake until the bread is deep golden brown on top, the crust is crisp, and it weighs about 960-970g.
- If the top browns too quickly, cover it loosely with aluminum foil (shiny side up) and continue baking.
- For an extra crisp crust, remove the bread from the loaf pan after baking.
- Place the bread directly onto a baking sheet and return it to the oven for a further 5-10 minutes.
- Immediately transfer the baked sandwich bread onto a wire rack to cool completely to room temperature (or at least lukewarm) before slicing.
Notes
If using active dry yeast, activate 10g with lukewarm milk and 1 tbsp sugar for 5-10 minutes before adding.
If dough is too sticky to handle, chill it in the fridge for about 1 hour before shaping.
Scoring the dough before proofing helps it rise evenly and prevents cracking.
Ensure the bread cools completely before slicing for the best texture.
Find it online: https://timelesscrumb.com/easy-gluten-free-sandwich-bread/