There’s just something magical about the smell of fresh bread baking in your own kitchen, isn’t there? For me, it brings back memories of cozy Sunday mornings and the comforting feeling of home. This Honey Whole Wheat Bread recipe isn’t just a recipe; it’s a little piece of that comfort, a wholesome loaf that tastes incredible and makes your house smell amazing. It’s become a staple in my home, and I can’t wait for you to try it!
Why You’ll Love This Honey Whole Wheat Bread
- It’s wonderfully soft and lightly sweet, perfect for toast or sandwiches.
- The whole wheat flour adds a lovely nutty flavor and extra goodness.
- It’s surprisingly easy to make, even for beginner bakers with a stand mixer.
- There’s nothing quite like homemade bread to impress your family and friends!
Ingredients You’ll Need
- Warm Milk and Water: These liquids need to be around 110°F (43°C). This is the perfect temperature to wake up your yeast without killing it. Think warm bathwater, not hot!
- Instant or Active Dry Yeast: This is what makes your bread rise! Don’t skip the “foaming” step; it tells you your yeast is alive and ready to work its magic.
- Honey: Not only does honey add that signature sweetness and flavor, but it also helps keep the bread moist and gives it a beautiful golden crust.
- Whole Wheat Flour: This is where the hearty, wholesome goodness comes from. It gives the bread its lovely texture and a slightly denser crumb than white bread.
- Bread Flour or All-Purpose Flour: Bread flour has a higher protein content, which helps develop gluten for a chewier texture. All-purpose works too, but you might find bread flour gives a slightly better rise.
- Melted Butter: Butter adds richness and helps keep the bread tender. Make sure it cools down before adding it to your dough!
- Olive Oil: Just a little bit to grease the bowl for the dough’s first rise, preventing it from sticking.
How to Make Honey Whole Wheat Bread Step by Step
First things first, grab your stand mixer bowl. We’re going to get our yeast happy! Pour in your warm milk and warm water – remember, around 110°F is ideal. Sprinkle your yeast over the top, then add a little sugar. Give it a quick whisk and let it hang out for 5 to 10 minutes. This is where you’ll see it get all foamy and bubbly, telling you your yeast is alive and ready to make some beautiful bread!
Once your yeast is bubbly, it’s time for the honey and whole wheat flour. Add those to the bowl and use your beater attachment to mix them until they’re just combined. Now, let that mixture sit for another 10 minutes. While it’s resting, melt your butter and let it cool down to room temperature. Stir in the salt with your butter and set it aside.
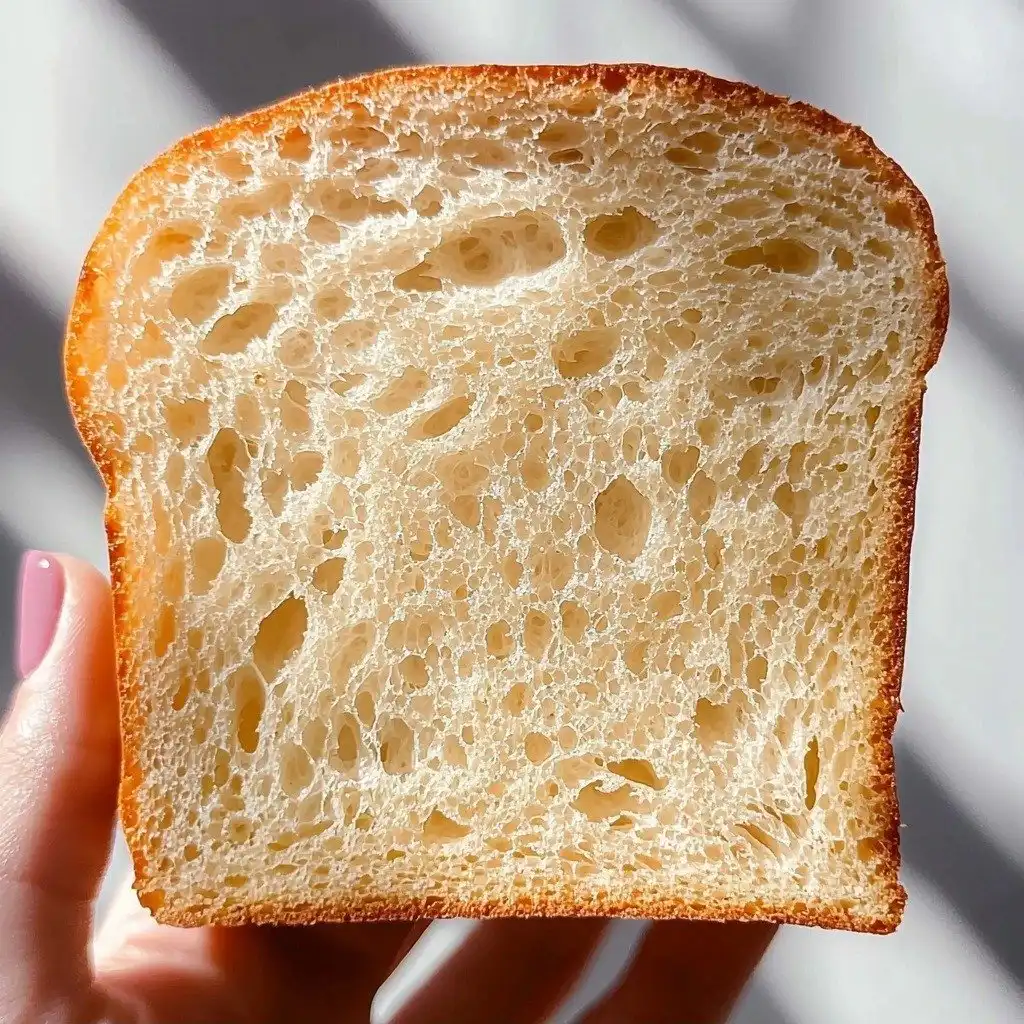
Now for the fun part – building the dough! Switch to your dough hook. Gradually add the 4 cups of bread or all-purpose flour. Then, pour in your cooled butter and salt mixture, scraping every last bit in with a spatula. Mix on low speed (speed 2) until the dough starts to come together around the hook, which usually takes about 2 to 3 minutes. If it’s still super sticky and clinging to the bowl, add a tablespoon of flour at a time, up to half a cup, until it pulls away and forms a nice ball around the hook. Once it’s all together, increase the speed to medium (speed 4-6) and let it knead for a full 10 minutes. This is where the magic happens and the gluten develops, giving your bread that lovely texture!
My Top Tips for Success
- I always make sure my milk and water are at the right temperature for the yeast. Too hot, and you kill it; too cold, and it won’t activate. A thermometer is your best friend here!
- In my experience, not rushing the rising times is key. Let the dough double in size fully, don’t cut it short. Good things come to those who wait!
- Trust me on this one: don’t skip the step of letting the melted butter cool. Adding hot butter to your dough can affect the yeast.
- When shaping the loaves, try to get them into a nice, tight cylinder. This helps them rise evenly in the pan.
- I always brush the warm loaves with a little extra butter right out of the oven. It gives them a beautiful shine and a super soft crust.
- Resist the urge to slice into it right away! Letting the bread cool completely on a wire rack allows the internal structure to set, preventing a gummy texture.
Common Mistakes to Avoid
- Using water that’s too hot or too cold: If your yeast doesn’t foam, your water temperature was likely off. Start again with fresh yeast and properly warmed liquids.
- Not kneading long enough: Under-kneaded dough won’t develop enough gluten, resulting in a dense, crumbly loaf. Knead for the full 10 minutes!
- Adding too much flour: While you might need a little extra flour if the dough is too sticky, adding too much will make your bread dry and tough. Add it one tablespoon at a time.
- Cutting into the bread too soon: Slicing warm bread can make it gummy inside. Always let it cool completely for the best texture.
How to Store Honey Whole Wheat Bread
- Countertop: Store in an airtight container or bread bag at room temperature for up to 3-4 days.
- Freezer: For longer storage, slice the cooled bread and freeze in an airtight freezer bag for up to 3 months. You can toast slices directly from frozen.
Frequently Asked Questions
What if my yeast doesn’t foam?
If your yeast doesn’t foam after 5-10 minutes, it means it’s either expired or your liquid temperature was off. You’ll need to discard that batch and start over with new yeast and correctly tempered milk and water.
Can I make this bread without a stand mixer?
Yes, you can! You’ll need to knead the dough by hand for about 10-12 minutes on a lightly floured surface. It’s a good arm workout!
Can I use all-purpose flour instead of bread flour?
Absolutely! The bread might be slightly less chewy, but it will still be delicious. Just use 4 cups of all-purpose flour as directed.
How do I know when the bread is fully baked?
The loaves should be golden brown on top and sound hollow when tapped on the bottom. An internal temperature of 200-210°F (93-99°C) is ideal.
Why did my bread turn out dense?
This could be due to several reasons, including inactive yeast, not kneading enough, or adding too much flour. Double-check your yeast and kneading time next time!
I genuinely hope you give this Honey Whole Wheat Bread a try. There’s nothing quite like the satisfaction of pulling a warm, golden loaf from your oven. It’s perfect for breakfast toast, hearty sandwiches, or just a simple slice with butter. If you make it, please let me know how it turns out!
PrintHoney Whole Wheat Bread

A wholesome and tender Honey Whole Wheat Bread recipe that’s perfect for toast, sandwiches, or simply enjoying with butter.
- Prep Time: 30
- Cook Time: 35
- Total Time: 190
- Yield: 2 loaves
- Category: Baking
- Method: Baking
- Cuisine: American
- Diet: Vegetarian
Ingredients
- 1 cup whole milk warm (110℉)
- 1 cup water warm (110℉)
- 1 tablespoon instant yeast or active dry yeast
- 1 teaspoon sugar
- 1/2 cup honey
- 2 cups whole wheat flour
- 4 cups bread flour or all-purpose flour, plus extra as needed
- 1 tablespoon salt
- 6 tablespoons butter melted
- 1/2 tablespoon olive oil
- Unsalted butter optional, for topping bread slices
Instructions
- Combine warm milk and water in a stand mixer bowl.
- Sprinkle yeast over the liquids.
- Sprinkle sugar on top of the yeast.
- Whisk briefly to combine.
- Let the mixture stand for 5–10 minutes until foamy.
- Pour honey into the yeast mixture.
- Add whole wheat flour to the mixture.
- Use the beater attachment to stir until just combined.
- Let this mixture sit for 10 minutes.
- Melt butter and let it cool to room temperature.
- Stir salt into the cooled butter.
- Set the butter-salt mixture aside.
- Switch to the dough hook on your stand mixer.
- Gradually add 4 cups of bread or all-purpose flour to the dough.
- Add the cooled butter and salt mixture, scraping it all in.
- Mix on low speed (speed 2) until the dough comes together around the hook (about 2–3 minutes).
- If the dough sticks to the bowl, add more flour, 1 tablespoon at a time, up to 1/2 cup extra, until it gathers around the hook.
- Increase speed to medium (speed 4–6) and knead for 10 minutes.
- Grease a large bowl with olive oil.
- Shape the dough into a ball.
- Place the dough ball in the greased bowl, turning to coat it in the oil.
- Cover the bowl with a damp cloth.
- Let the dough rise in a warm place until doubled in size, about 1 hour.
- Punch down the dough to release air.
- Divide the dough into 2 equal parts.
- Shape each half into a loaf.
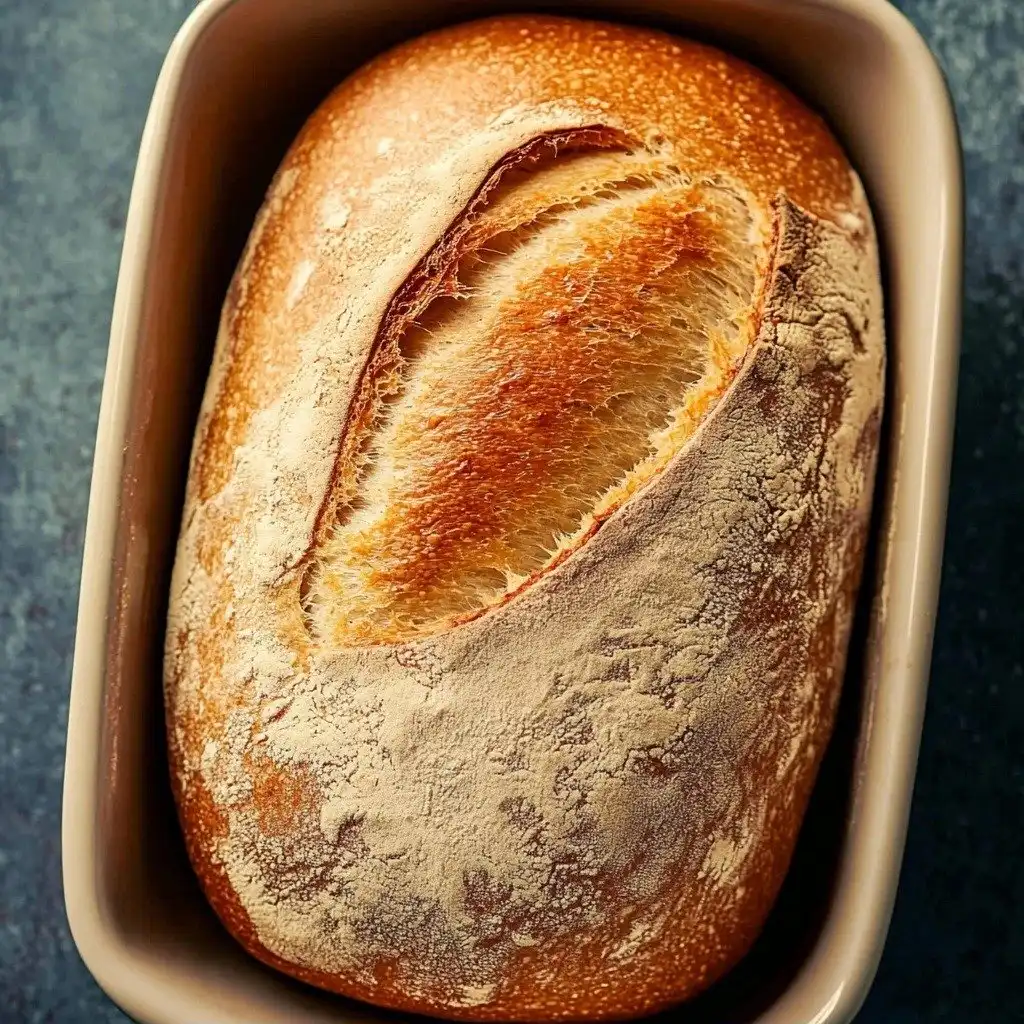
- Place each loaf in a greased 8×4-inch bread pan.
- Cover the pans with a damp cloth.
- Let the loaves rise for another hour, or until doubled in size.
- Preheat oven to 375°F.
- Bake the loaves for 30–35 minutes.
- Brush the tops of the hot loaves with unsalted butter (optional) as soon as they come out of the oven.
- Let the bread cool in the pans for 15 minutes.
- Transfer the loaves to a wire rack.
- Cool for at least 30 minutes before slicing.
Notes
Ensure your milk and water are at 110°F (43°C) for optimal yeast activation.
Don’t rush the rising times; let the dough double fully for a light texture.
Brush the warm loaves with butter for a soft, shiny crust.
Allow bread to cool completely on a wire rack before slicing to prevent a gummy texture.