There’s something so magical about homemade truffles, isn’t there? For me, they bring back memories of cozy holiday gatherings, where a tray of these rich, bite-sized treats would always disappear first. They feel so fancy, yet they’re surprisingly simple to make.
Why You’ll Love This Chocolate Kahlua Truffles!
- They’re incredibly rich and decadent, perfect for a special treat.
- You only need a few simple ingredients to make them.
- No baking required, and the steps are super easy to follow.
- They make fantastic edible gifts for friends and family!
Ingredients You’ll Need
- Semi-sweet chocolate chips: These are the star of the show! Use good quality chips for the best flavor and texture. You can also use chopped semi-sweet chocolate bars.
- Sweetened condensed milk: This is what gives the truffles their fudgy, creamy texture and sweetness. Don’t confuse it with evaporated milk – they’re very different.
- Kahlua: This coffee-flavored liqueur adds a wonderful depth and warmth to the chocolate. It’s subtle but makes a big difference!
- Christmas red, green, and white nonpareils: These add a festive touch and a fun little crunch. Feel free to use any sprinkles you like, or even cocoa powder or chopped nuts.
How to Make Chocolate Kahlua Truffles! Step by Step
Let’s get started on these delicious Chocolate Kahlua Truffles! First, you’ll want to set up your double boiler. If you don’t have one, no worries! You can easily make one by placing a heatproof bowl over a saucepan of simmering water. Just make sure the bottom of the bowl doesn’t touch the water.
Once your double boiler is ready, add your semi-sweet chocolate chips, sweetened condensed milk, and Kahlua to the bowl. Stir everything together gently as the chocolate melts. This is where the magic happens – watch as it all transforms into a smooth, glossy, irresistible mixture. Keep stirring until it’s perfectly smooth with no lumps.
Now, carefully scoop that beautiful chocolate mixture into a separate bowl. Pop it into the fridge for about 3 hours. This chilling time is super important because it helps the mixture firm up so you can easily roll it later. Don’t rush this step!
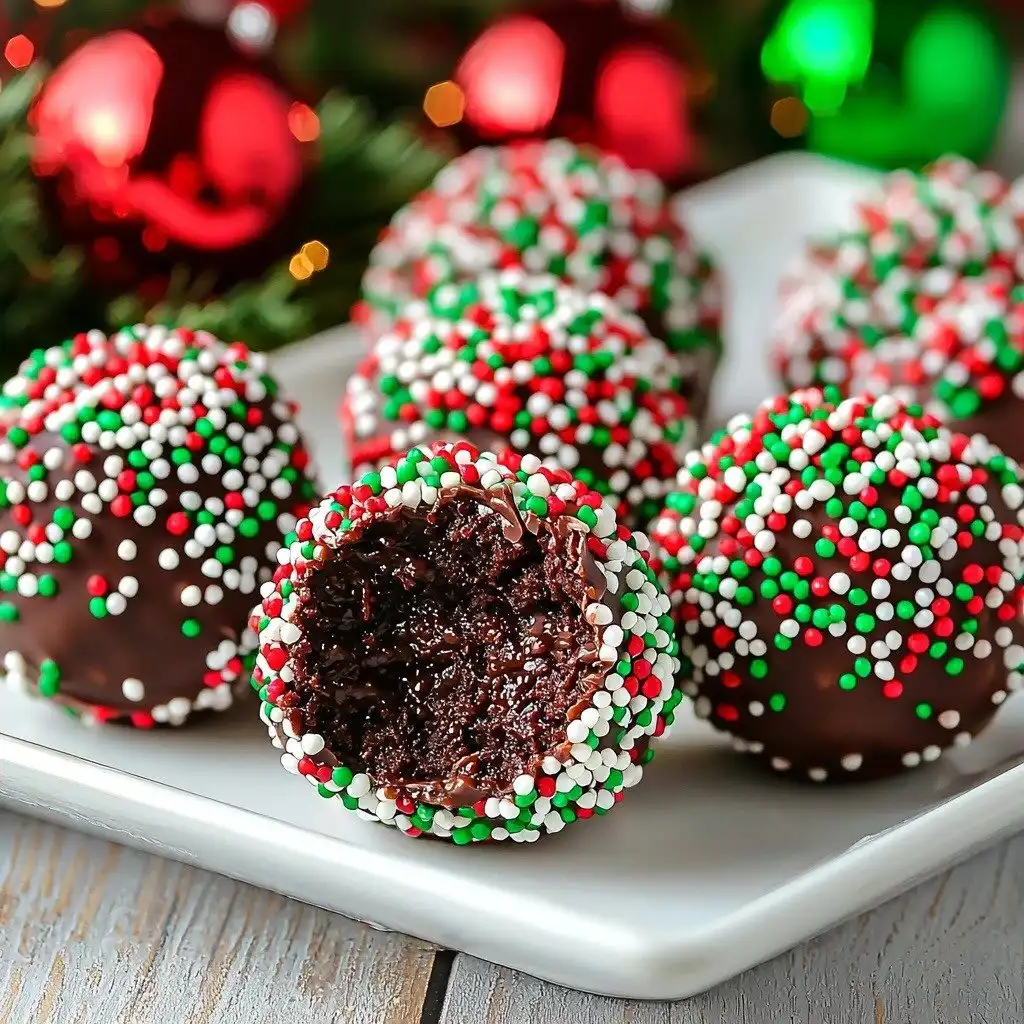
After chilling, it’s time for the fun part: rolling! Grab a small ice cream scooper – this helps keep your truffles a consistent size. Scoop out a bit of the mixture and roll it between your hands to form a nice, smooth ball. It might be a little sticky at first, but your hands will warm it up just enough. Pour your festive nonpareils into a shallow bowl, then roll each truffle in the sprinkles until it’s completely coated. Place your finished truffles onto a parchment paper-lined cookie sheet. Keep going until all your delicious Chocolate Kahlua Truffles! are rolled and coated. And that’s it – you’re ready to enjoy!

My Top Tips for Success
- I always recommend using good quality chocolate chips. It really does make a difference in the final taste and texture.
- Trust me on this one: don’t skip the chilling time! Three hours in the fridge is essential for firm truffles that are easy to roll.
- In my experience, using a small ice cream scooper makes rolling much easier and helps ensure all your truffles are roughly the same size.
- If your hands get too warm and the mixture becomes sticky while rolling, simply take a short break or rinse your hands with cold water.
- Get creative with your coatings! While nonpareils are fun, cocoa powder, finely chopped nuts, or even a drizzle of white chocolate are great too.
Common Mistakes to Avoid
- Overheating the chocolate: This can cause the chocolate to seize or become grainy. To avoid this, melt the chocolate slowly over a double boiler and stir constantly. Remove it from the heat as soon as it’s smooth.
- Not chilling long enough: If the mixture isn’t firm enough, your truffles will be too soft and difficult to roll. Make sure to chill for the full 3 hours.
- Skipping the parchment paper: The truffles can stick to a bare cookie sheet, making them hard to remove. Always line your sheet with parchment paper for easy handling.
- Using evaporated milk instead of sweetened condensed milk: These two are not interchangeable! Sweetened condensed milk is thick and sweet, while evaporated milk is unsweetened and much thinner. Using the wrong one will ruin the recipe.
How to Store Chocolate Kahlua Truffles!
- Airtight container in the fridge: Up to 2 weeks. Place a piece of parchment paper between layers to prevent sticking.
- Airtight container in the freezer: Up to 1 month. Thaw in the refrigerator before serving.
Frequently Asked Questions
Can I make these truffles without Kahlua?
Yes, you can! If you prefer to omit the Kahlua, you can substitute it with an equal amount of strong brewed coffee or espresso for a similar flavor profile, or simply leave it out.
What if my chocolate seizes?
If your chocolate becomes clumpy or grainy, it likely got too hot or had a tiny bit of water introduced. Try adding a teaspoon of vegetable oil or melted butter and stirring vigorously to smooth it out, but sometimes it’s best to start over.
Can I use different types of chocolate?
Absolutely! While semi-sweet is traditional, you can experiment with milk chocolate or even dark chocolate for a richer flavor. Just be aware that the sweetness level will change.
How far in advance can I make these?
These Chocolate Kahlua Truffles! are perfect for making ahead! You can prepare them up to two weeks in advance and store them in an airtight container in the refrigerator.
Can kids help make these?
Kids can definitely help with the rolling and decorating steps once the mixture is chilled! Just be sure an adult handles the melting chocolate part.
I hope you have so much fun making these Chocolate Kahlua Truffles! They’re truly a delightful treat, perfect for sharing or keeping all to yourself. If you give them a try, I’d absolutely love to hear how they turned out for you!
PrintChocolate Kahlua Truffles!

Rich and decadent, these no-bake Chocolate Kahlua Truffles are easy to make with just a few ingredients, perfect for holidays or any special occasion.
- Prep Time: 20
- Cook Time: 10
- Total Time: 210
- Yield: 30-36 truffles
- Category: Dessert
- Method: No-Bake
- Cuisine: American
- Diet: Vegetarian
Ingredients
- 3 C semi sweet chocolate chips
- 1 14 oz can of sweetened condensed milk
- 2 tsp Kahlua
- 1 C Christmas red green and white nonpareils
Instructions
- Prepare a double boiler by placing a heatproof bowl over a saucepan of simmering water, ensuring the bowl does not touch the water.
- Add the semi-sweet chocolate chips to the bowl.
- Add the sweetened condensed milk to the bowl.
- Add the Kahlua to the bowl.
- Stir the mixture constantly until all ingredients are combined and the chocolate is smooth and melted.
- Remove the bowl from the heat.
- Scoop the melted truffle mixture into a clean bowl.
- Place the bowl with the truffle mixture into the refrigerator.
- Chill the truffle mixture for 3 hours until firm.
- Line a cookie sheet with parchment paper.
- Pour the Christmas red, green, and white nonpareils into a shallow bowl.
- Use a small ice cream scooper to scoop out a portion of the chilled truffle mixture.
- Roll the scooped truffle mixture between your hands to form a smooth ball.
- Roll the chocolate truffle ball into the bowl of nonpareils until it is fully coated.
- Place the coated truffle onto the prepared parchment paper-lined cookie sheet.
- Repeat the scooping, rolling, and coating steps with the remaining truffle mixture until all truffles are formed.
- Serve and enjoy!
Notes
Use good quality chocolate for the best flavor.
Ensure the truffle mixture is fully chilled for easy rolling.
An ice cream scooper helps keep truffles uniform in size.
Experiment with different coatings like cocoa powder or chopped nuts.